Showing posts with label Recipes. Show all posts

Monday, 25 January 2021

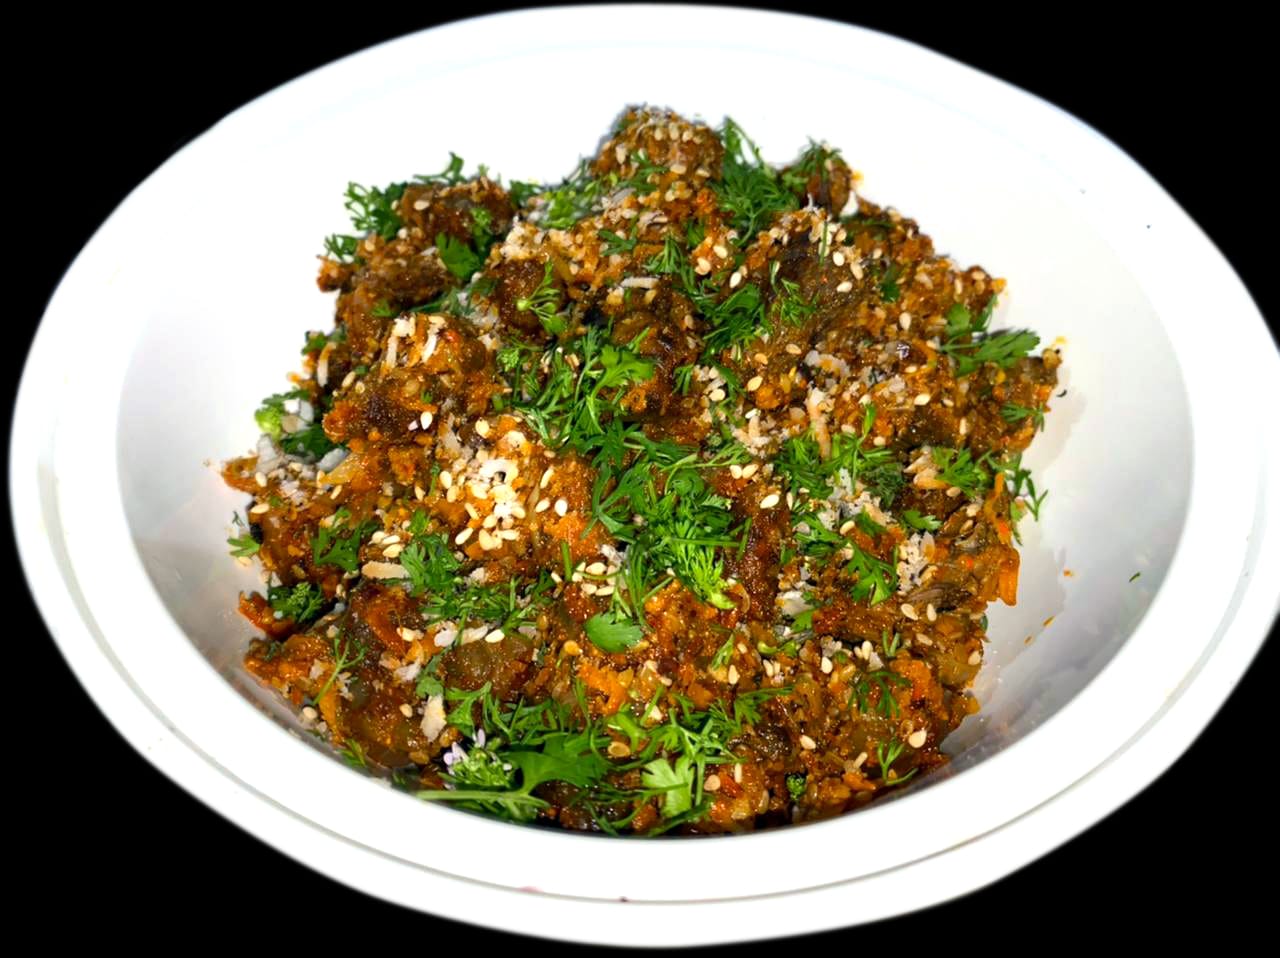
Instant Pickled Pork

Picture credit:  Sreyas Patil/Pratik Mulik

I have always enjoyed experimenting with flavours.  It is a trait my daughter, Shalvi, has inherited too!  Our family has always relished pork and I have had many successful experiments with cooking the same (and some disasters too!).  Shalvi, during one of her experiments in the kitchen, came up with this awesome recipe that I am sharing with my beloved readers today.  Happy cooking!

Ingredients:

Pork belly - 250 g

Oil - 2 tbsp

Onions - 2 large (sliced longitudinally)

Thick curd - 100 ml

Ginger-garlic paste - 2 tsp

Pickle masala - 2 tbsp  (find recipe here)

Dry coconut - 50 g (grated and mildly roasted) 

White sesame seeds - 50 g (roasted)

Turmeric - 1 tsp

Salt to taste

Lemons - 2 large and juicy

Coriander for garnishing


Time:

Prep Time:  10-15 minutes

Cook Time:    40 minutes

Seasoning:    10 minutes


Method:

Chop the pork into bite-sized pieces.  Add in turmeric and salt and toss.  Cook the pork in a pressure cooker.  After the first whistle, lower the flame and let it simmer for at least 30 minutes.   Once the pressure is released, drain any of the liquid in the pork and set aside.  (Take a bite to ensure it is properly cooked).


In a pan, heat the oil. Add onions and sauté till golden.  Add in curd, pickle masala, ginger garlic paste and some salt and cook till the mixture leaves the sides.  Add in the pork and stir it till it becomes homogeneous.  Add in the grated coconut and sesame seeds (save a small amount of both for garnishing) and stir well.  Cover the pan and simmer for five minutes.  Squeeze the juice of lemons and stir.  Transfer to a bowl, garnish with sesame, grated coconut and coriander leaves and serve hot.


Tips:

  • You may use store-bought mango pickle masala
  • Do not add water to the pork pieces - it will spread its own juice - cook in a separator
  • Add in a pinch of salt to the onions; they turn golden faster this way
  • You may substitute the pork with boneless lamb meat for pickled mutton (of course, cooking time will be lesser!)
  • Always use fresh home-made ginger garlic paste to get the best flavour
  • Please note this pickle is NOT for storage, but will stay for over a week in the refrigerator.
If you liked this recipe and other posts, please do share, follow and subscribe to the blog.  

Monday, 18 January 2021

Pickle Masala Powder


Indian cuisine is known for its perfect blend of spices which can give our taste buds a near orgasmic experience! Particularly, if you are into experimenting with flavours just like me, you can find a variety of dishes where the same spicy mixtures can be incorporated to create surprisingly delicious results. Presenting one such recipe which is traditionally used for pickling raw mangoes in summer which you can have a great time experimenting with.  Happy cooking!

Ingredients:

  • Turmeric powder (haldi) - 2 teaspoons
  • Powdered asafoetida (hing) - 1 teaspoon 
  • Fenugreek seeds (methi) - 1 tablespoon 
  • Mustard - 3 tablespoons  
  • Red chilli powder - 3 tablespoons 
  • Onion nigella Seeds (kalonji) - 1 tablespoon 
  • Fennel seeds (saunf) - 1 tablespoon 
  • Coriander seeds (dhania) - 2 tablespoons


Method:

  • In a pan, dry roast the fenugreek seeds till  they turn light golden.  Transfer to a plate and set aside to cool
  • Similarly, one by one, using the same pan, dry roast fennel (until it turns aromatic), the kalonji (till just warm) and the coriander seeds (until light golden) and transfer to the same plate
  • Once all of the above have cooled down, add the turmeric, chili powder, asafetida, and mustard and grind to a coarse powder in a mixer grinder
  • Store in an air-tight container for future use

Tip:

This spice mix tastes best with acidic foods

Friday, 15 January 2021

Tilache laddoo


After reading my post on Makara Sankranti, my sister-in-law, Sarita sent me a picture of the sesame laddoos she had made.  I asked her to share the recipe too.  She did, and here's me sharing the recipe with all of my beloved readers!


Ingredients:

1 cup white sesame seeds

½ cup groundnut seeds

½ cup sugar

1 tbsp ghee


Preparation Time:  

None


Cooking Time:  

10-15 minutes


Time to Make the Laddoos:  

Depends on your skill level!


Method:  

In a pan, dry roast the sesame seeds on a low-to-medium flame, until they splutter.  Set aside to cool.  In the same pan, still keeping the flame at low to medium, dry roast the groundnut seeds till they turn aromatic.  Once they cool, de-husk and grind them finely with the roasted sesame and sugar in a mixer grinder.  In a bowl, add one tablespoon ghee to the ground mixture and make small, ball-shaped laddoos.


My Tips:

  • Substitute the sugar with jaggery powder to relish an actual til-gul laddoo!
  • Grease your palms with a little ghee while making the laddoo


This is a super easy, no-fuss recipe.  Do try it out and share the results of your trial (including pictures) in the comments section.


Sarita is a great cook.  I have asked her to share the recipes of some of her yummy, not-so-common dishes that she keeps treating us to.  Do keep an eye out for the label  "Sarita Vanjari" the next time you visit this blog.


If you liked this recipe and other posts, please do share and subscribe to the blog.

Thursday, 14 January 2021

Cheesy Chicken Balls

Today, on Kinkrant, we planned on chicken for dinner.  My family challenged me to make something I had never made at home before.  We had recently eaten cheesy potato balls in Dominos and I decided to make something similar.  The Chicken Cheesy balls turned out to be a superhit with my family!  Sharing the same here.

Time

Prep time 15-20 minutes.  Cook time 10-15 minutes.  Eating time 2 seconds (they just disappear as they come out of the pan!)

Ingredients

Boneless chicken 250 g
Green Chillies  1-2
Ginger 1" piece
Garlic 6 cloves (peeled)
Oregano/mixed herbs 1/2 tsp (optional)
Shredded Mozzarella cheese 200 g (I used Amul pre-shredded cheese)
Bread crumbs 1 cup
Maida/all-purpose flour 1/2 cup
Oil for deep frying
Salt to taste

Procedure

Make a paste of ginger, garlic, and green chili in a mixer/grinder (do not add water).  Mince the boneless chicken in the mixer grinder (will get a dough-like consistency).  To the minced chicken, add salt, mixed herbs, ginger/garlic/chili paste and knead well till uniformly mixed.  Take a small ball of the mincemeat mixture and flatten it on your palm.  Place a generous amount of cheese on it and wrap it up in the chicken and roll slightly to get a uniformly shaped roll.  Make all rolls and set aside.  In a bowl make a paste of the all-purpose flour with water.  Heat oil in a pan.  Dip each ball in the flour paste, roll it in bread crumbs and deep fry till golden brown.  Serve piping hot with tomato ketchup or green chutney dip.

Do try it out and share the results of your trial (including pictures) in the comments section.

If you liked the recipe and other posts, please do share and subscribe to the blog.


Tips:

  • If you like it spicy, you can add some pepper powder to the minced meat.
  • Grease your palms with a little oil while making the balls.
  • The all-purpose flour paste should not be too thick in consistency, should only have a thin coat of the same on the balls.

Green Chutney Dip


Description

An ideal accompaniment for most Indian starters, the green chutney is also used as a base for sandwiches.  Easy to make and high on nutritional value, this chutney can be stored in the refrigerator for over a week.

Ingredients

Mint leaves - 1/2 cup
Coriander - 1/2 cup
Garlic - 6-8 cloves
Ginger - 1 inch
Green Chili -  2-3 (depending on how spicy you like your dip to be)
Juice of half a lemon
A pinch of sugar
Salt to taste

Time

Prep time, less than 10 minutes.  Cook time, Zero.

Procedure

Finely grind all the ingredients in a mixer/grinder with minimal water.  Your chutney dip is ready to be savoured.


Tips

  • The chutney should be of thick, flowing consistency.
  • Wash all ingredients except garlic before grinding.
  • When washing any vegetable, preferably wash in a bowl of water to which tiny amount of potash alum has been added.  The potash alum will aid in making soil separate from the vegetables and settle in the bottom.
  • Finally, last but not the least, the sugar balances out the salt in a savoury dish just as salt balances the sugar in a sweet dish.

Tuesday, 19 November 2019

Kolhapuri chutney/dry spice mix


Description

This is a traditional spice mix of Kolhapur.  We Kolhapuris (आम्ही कोल्हापुरी) cannot cook without this spice mix.  This mixture contains most of the spices used in Indian cuisine and one need not add anything else to the recipe after adding this.  Kolhapuri rassa and sukka recipes are incomplete without Kolhapuri chutney.  Local Kolhapuri people generally prepare this in large quantities (5-6 kg of chillies which yields about 10-12 kg of chutney) in the summer and store it in large china containers.  The chillies and spices are pounded (not ground in a flour mill).  The pounding gives a distinct flavour to the chillies.  My mother-in-law used to own a pounding machine that she operated in a room attached to the house.  The aroma of the chutney floating through the house during the summer months was mesmerising.  Today, I am bringing to you a recipe she taught me that has been graded down and can be prepared at home.

Ingredients:

Red chilli powder - 500 gm
Refined cooking oil - 1/2 L (approx)
Rock salt - 500 gm
Dry coconut - 150 gm

Ingredients for dry roasting:

Coriander seeds (dhaniya) 75 g
White sesame seeds (til) - 75 g

Ingredients to be roasted in a generous amount of oil

Bay leaves (tamalpatri) - 5-10
Black pepper  (kali mirch) - 3-4 (if you do not like it too spicy, skip)
Cloves (laung) - 8-10
Cinnamon (dalchini) - two 2-inch pieces
Black cardamom (kali elaichi)- 5
Green cardamom (hari elaichi)- 8-10
Star anise (Badam phool ) - 2
Mace (Jaipatri)- 2 (also called Ram patri or Ram phool)
Tailed pepper (nakeshwar) - 1 tsp
Asafetida (hing) - 1/2 cube (usually 1 inch x 1 inch)
Turmeric stick (halkund) - 3
Nutmeg (Jaiphal) - 1/2
Black stone flower (dagadful) - one pinch
Mustard seeds - 2 tsp.
Onions - 250 gm

Ingredients to be added raw

Garlic - 100 gm (peeled)
Ginger - 100 gm (washed and skinned)
Coriander leaves (washed, dried and chopped) - 1 cup
Cumin seeds (jeera) - 75 g
Black cumin seeds (shahjeera) - 1 tsp

Method:

1.  Peel and slice the ginger, peel the garlic, peel and chop the onions, slice the dry coconut in thin slices.
2.  In a pan, dry roast sesame seeds until they splutter.  Set aside.
3.  Dry roast the coriander seeds till the aroma is liberated.  Set aside in a separate plate.
4.  Ensure the rock salt is absolutely dry (you can dry it out in the sun or roast in a pan).
5.  Check your cumin seeds.  If they are not very crisp (usually happens in cloudy weather/monsoon) warm them up for a couple of minutes in the pan.
6.  Heat approx 100 ml of oil in the pan.  Roast the dry coconut till golden brown in colour.  Remove from oil and set aside.
7.  In the same pan, add in some more oil and roast each of the ingredients under the heading " Ingredients To Be Roasted In A Generous Amount Of Oil" (excluding onions) one by one in the order they are listed.  Add in oil as needed.  You can collect all of the oil-roasted ingredients in the same container. 
8.  Add in rest of the oil and roast the onions on a low flame till golden brown.
9.  Let all the ingredients cool down.
10.  In a mixer grinder, finely grind all the coriander seeds.  Run the powder through a sieve.  If there is too much residue in the sieve, grind again with some salt.  Run through the sieve again.
11.  Grind the sesame seeds with a handful of salt to a fine powder.
12.  Grind the dry coconut slices finely with some salt.
13.   Grind the oil-roasted spices (add in the cumin seeds) finely with some salt.
14.  Drain oil from onion.  Grind the mixture of oil, garlic, ginger, and coriander leaves with all the remaining salt to a fine paste.  DO NOT ADD ANY WATER.
15.  In a large bowl, add in the chilli powder, coriander powder, sesame powder, dry coconut powder, and all the ground spices including the ginger/garlic/onion/coriander paste and mix uniformly.  Add in the oil drained from the roasted onions and mix again.  Cover with a clean fabric and set aside to cool down for 10-12 hours.  Store in an airtight container.  Stays well for over a year.


Tips

  • Adding salt while grinding helps to make a fine powder or paste of the ingredients without having to add water. 
  • When using this spice mix in your daily cooking, skip salt or add minimum salt after tasting.  You will get an idea of the amount of salt needed after cooking a couple of times.
  • Do not store the mix in a metal container as the salt will corrode the metal.  Ideally, it is stored in chinaware, but Tupperware or food-grade airtight plastic containers should also do.
Friday, 12 April 2019

Muskmelon Drink/Panaka

Cantaloupe


Ingredients

Pulp of one medium-sized muskmelon
Jaggery 200 gm (grated/crushed)
Green cardamom 4, peeled and crushed
Water 2 L

Method

Deseed and blend the pulp of the muskmelon in a blender to a smooth consistency.  Add in the rest of the ingredients and stir till the jaggery dissolves.  Serve chilled for a refreshing, hydrating, rejuvenating natural drink this summer.

Tips

1.  One may add a pinch of salt to balance the sweetness of jaggery.
2.  Adding half a teaspoon of ginger paste gives a wonderful flavour to the drink.

Tuesday, 19 February 2019

Savoury Pongal Recipe/Venn Pongal


Last week, I shared with you the recipe for Sweet Pongal.  Today, I will introduce to you its savoury cousin, Venn Pongal.  While Sweet Pongal is used as an offering to Gods during festivals such as Rathasaptami  and Pongal, (Tamil new year), Venn Pongal is one of the popular breakfast dishes of South India.  Even though this is labelled as a breakfast food, it can be consumed for lunch/dinner too.  My friends love this dish so much that when they visit me, they make me prepare it irrespective of the time of the day/night.   Importantly, all the ingredients needed are generally readily available at home.  It is nutritious, delicious, filling and easy to make; in short, an ideal breakfast recipe.


Ingredients:

Fine Rice 1 cup
Moong Dal 1 cup (yellow petite lentils)
Pepper 4-6
Ginger 1 inch piece, finely grated
Cumin seeds 1 tsp
Ghee 1-2 tablespoons (or edible oil of your choice)
Salt to taste
Curry leaves 5-6 leaves
Red Chili, one or two (optional)
Coriander for garnishing.(optional)

Time:

Preparation time 5 minutes, cooking time 20 min approx.  Serves 4.


Procedure in Detail:


Dry roast the rice and moong dal separately in a pan.  Wash and drain the rice and dal mixture.

In a pressure pan, bring to boil 5 cups of water.  Add the rice and dal mixture to the water, add salt, cover and cook on low flame for two or even three whistles of the cooker.

Once the cooker has cooled down, check the consistency of the rice.  It should have a thick and porridgy consistency.  If it is thicker, add hot water and bring to boil.  The final consistency of the Pongal should be thick and porridgy.  Transfer to a serving bowl.

For the seasoning, heat ghee/edible oil in a pan, splutter the pepper, add in the cumin seeds, add curry leaves once the cumin has spluttered, add in ginger and red chili.  Pour sizzling hot on the cooked pongal.  Garnish with coriander.

Tastes best served hot with fresh coconut chutney.

Tips:

1.  If you are health/calorie conscious, you can substitute the fine rice with millet, brown rice, oats or quinoa.  If you are using brown rice, dry roast and soak for at least an hour before cooking.
2.  If you are looking for totally oil-free cooking, skip the seasoning and add in the cumin seeds, pepper and grated ginger while cooking in the pressure cooker.  Add crushed garlic if it suits your taste.  Your oil-free Venn Pongal is ready to eat.
3.  One can add chopped french beans, fresh green peas, and carrots to enhance the nutrition value.
4.  If you would rather use a microwave oven instead of a pressure cooker, set the rice, dal and water mixture in the oven at high for 10 minutes and check the consistency in the end.
5.  The consistency of Pongal will largely depend on the rice used.  Basmati will not cook to a soft consistency.  Select rice that cooks to soft consistency; e.g., sona masouri or kolam.

Tuesday, 12 February 2019

Sweet Pongal Recipe

It is the tradition in India to offer sweets to God before starting any new venture.  Thus, in keeping with the tradition, I started this blog with an appreciation of my motherland followed by an article on Sun God for Rathasaptami.  Today  being Rathasaptami, following the south Indian tradition to offer pongal to Sun God, I am herein putting up my first recipe, Sweet Pongal, an offering to Sun God on Rathasaptami.

Traditionally, Pongal is cooked in the community in an earthen pot on an open fire and takes hours to cook.  I am bringing you a modernised pressure cooker version of the recipe.


Ingredients:

Fine Rice 1 cup
Moong Dal (yellow petite lentils)1/2 cup
Grated Jaggery 1 cup
Cloves  4 (optional to balance the sweetness; can use a small pinch of salt instead)
Cardamom 4 (peeled and crushed)
Dry fruits for garnishing.
Ghee 5 tablespoons (can cut down to 1 tablespoon according to taste and health preferences)

Time:

Preparation time 5 minutes, cooking time 20 min approx.  Serves 4.

Procedure in Detail:
Dry roast the rice and moong dal separately in a pan.  Wash and drain the rice and dal together.

In a pressure pan, bring to boil 5 cups of water.  Add the rice and dal mixture to the water, cover and cook on low flame for two or even three whistles of the cooker.

In the meanwhile, add half a cup of water to the grated jaggery in a saucepan and heat it till the jaggery dissolves.  Do not boil it.  Will become syrupy.

Once the cooker has cooled down, check the consistency of the rice.  It should have a thick and porridgy consistency.  If it is thicker, add hot water and bring to boil.  Then add the jaggery water and boil for another 5 minutes.  The final consistency of the Pongal should be thick and porridgy.  Transfer to a serving bowl.

For the seasoning, heat ghee in a pan, splutter the cardamom and cloves, add in the dry fruits and roast them till golden brown.  Pour sizzling hot on the cooked pongal.

Tastes best served hot.

Tips:

1.  If you are health/calorie conscious, you can substitute the fine rice with millet, brown rice, oats or quinoa.  If you are using brown rice, dry roast and soak for at least an hour before cooking.
2.  If you would rather use a microwave oven instead of a pressure cooker, set the rice, dal and water mixture in the oven at high for 10 minutes and check the consistency in the end.  Add in grated jaggery/jaggery powder after cooking and set in oven for another 5 minutes.
3.  The consistency of Pongal will largely depend on the rice used.  Basmati will not cook to a soft consistency.  Select rice that cooks to soft consistency; e.g., sona masouri or kolam.